Create or use an Apple ID without a payment method — Apple Support
You can create an Apple ID without entering a payment method. You can also remove payment methods from your existing Apple ID.
Apple recommends that you use only one Apple ID to access iTunes, iCloud, and other Apple services. If you don’t remember if you have an Apple ID, we can help you find it.
If you don’t have an Apple ID, you can create an Apple ID without a payment method.
You can also remove payment methods that you previously added to your Apple ID.
If you already have an Apple ID
You can remove payment methods from your existing Apple ID after you sign in to the App Store, iTunes Store, or Apple Books. You won’t be asked for a payment method again until you make a purchase. Learn what to do if you can’t remove your last payment method from your Apple ID.
If you’re the family organizer for a Family Sharing group and want to share purchases with your family, you’re required to have at least one payment method on file. A payment method is also required to set up accounts for children. Learn more about Family Sharing and Apple IDs for kids.
If you don’t have an Apple ID
You can create an Apple ID without adding a payment method in the App Store on your iPhone, iPad, or iPod touch, or on a Mac or PC.
On an iPhone, iPad, or iPod touch
- Open the App Store app and find a free app.
- Tap the Get button.
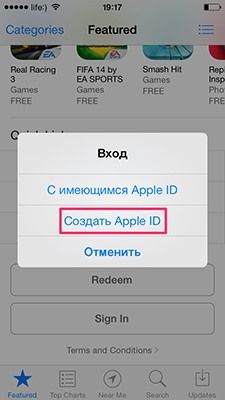
- When you’re asked to sign in with an Apple ID, tap Create New Apple ID.
- Follow the onscreen instructions. When you’re asked for payment information, choose None. See what to do if None isn’t showing or you can’t select it.
- After you enter your information, you’ll be asked to verify a trusted phone number if you’re eligible to use two-factor authentication. Otherwise, you’ll be asked to verify your Apple ID by email. You must verify your Apple ID before you can begin using it.
On a Mac
- Open the App Store and find a free app.
- Click the Get button, then click Install.
- When you’re asked to sign in with an Apple ID, click Create Apple ID. If you don’t see an option to create a new Apple ID, you are signed in to the App Store, iTunes Store, Apple Books, or iCloud with an existing Apple ID.
- Follow the onscreen instructions. When you’re asked for payment information, choose None as the payment type. See what to do if None isn’t showing or you can’t select it.
- After you enter your information, you’ll be asked to verify a trusted phone number if you’re eligible to use two-factor authentication. Otherwise, you’ll be asked to verify your Apple ID by email. You must verify your Apple ID before you can begin using it.
On a PC
If you have a PC, find a free item in the iTunes Store, try to download it, then follow the prompts to create a new Apple ID.
If you can’t find a free item, use an iOS device to create a new Apple ID.
May 09, 2019
Как зарегистрироваться в App Store

Для нормального функционирования, каждому устройству на IOS нужен аккаунт Apple ID. С его помощью пользователям доступны все ключевые функции служб Apple. Рассмотрим, как создать учётную запись для использования AppStore.
Эпл ИД нужен для того, чтобы устройство имело доступ к таким службам, как Эппстор, ICloud, Apple Music
, и прочее. Он позволяет синхронизировать устройства между собой, сохранять данные, скачивать бесплатные или платные программы из магазина приложений.
Создание учётной записи через компьютер значительно упрощает ввод данных. Для этого нужно:
- Открыть сайт https://appleid.apple.com/.
- Выбрать пункт «создать Apple ID».
- Заполняем форму регистрации.
- Выбираем три тайных вопроса и отвечаем на них.
- Ставим или убираем галочки, проходим капчу и выбираем «продолжить».
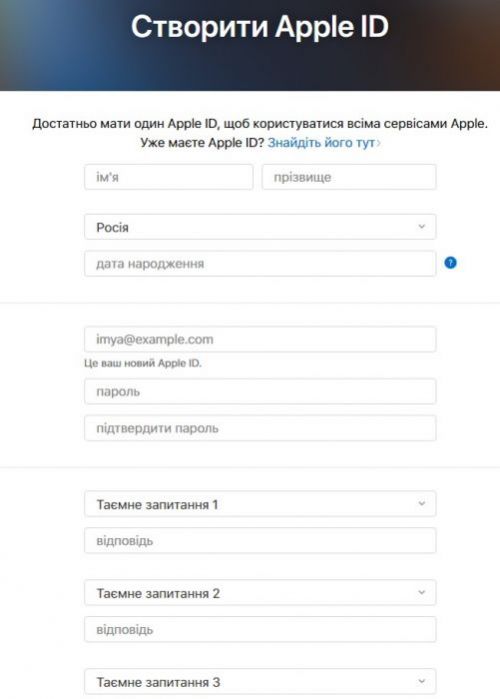 Окно регистрации
После этого нужно подтвердить адрес электронной почти. Нужно открыть свой email и найти письмо от Apple. В нём будет код проверки, который нужно ввести в окно регистрации. Код состоит из шести цифр. Теперь новый ID создан.
Иконка App Store
Зарегистрировать учётную запись можно как с ПК, так и с мобильного устройства. Рассмотрим вариант с компьютером.
Открываем ITunes и выходим с существующей записи. После этого переходим в раздел «приложения», и листаем до низу, пока не найдём флаг США. Выбираем его. С правой стороны будет меню, в котором нужно выбрать одно из предложенных бесплатных приложений. Выбираем «Get», после чего нажимаем на «создать Apple ID».
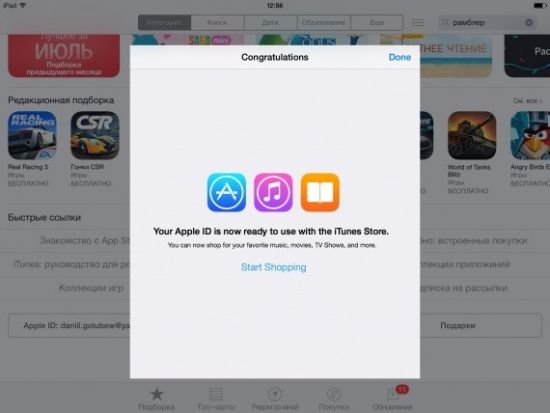 Аккаунт готов к использованию
2.Выходим с аккаунта и ищем какую-то бесплатную программу.
3.Выбираем «Get», переходим в раздел создания аккаунта.
 Переходим в раздел создания аккаунта
4.Ищем United States и принимаем лицензионное соглашение.
5.Вводим регистрационные данные.
6.Пропускаем пункт с вводом карты.
7.Добавляем существующий адрес и номер телефона из США.
8.Подтверждаем аккаунт.
Таким образом, видим, что создание аккаунта на телефоне ничем не отличается.
Самостоятельное создание Apple ID совсем не трудное. С этим справится каждый, главное следовать инструкции. Айди создаётся на всех устройствах практически одинаковыми способами.
Самая важная часть при регистрации американской учётной записи – иметь реальный адрес и номер телефона из США. Без них создать аккаунт не получится. Поэтому желательно поискать настоящий адрес на Гугл Картах, например, какого-то отеля, и ввести его данные.
Как зарегистрироваться в iCloud?
Видео по теме
-
Embedded video

-
Embedded video

-
Embedded video

-
Embedded video